Calendar plugin

+ Event Label plugin

  • Stacks Image 1389
  • Stacks Image 1392
  • Stacks Image 1395
  • Label
  • Stacks Image 1124

Calendar_en Calendar Plugin:
A rectangle plugin Object.
Create fully customizable calendars (or time scale) with this plugin. Draw a square, set a starting date, the duration and that is it. Set what you need to see, days, weeks, months, years.
Calendar is for any one who wants to visualize and communicate date and times informations, for example project schedules, retro-plans, directly in VectorWorks.
it is not a project scheduler, it's a "visual" scheduler.
Calendar is really simple to use, utilizing all great graphics potential used by Vectorworks such as sketch, line type, transparencies etc...

This is a pdf example .

The calendar plugin is written in Python which was introduced to Vectorworks as a scripting language in Vectorworks 2014.
You will need to have Python 3 installed on your computer in order to run the plugin. Python is normally already installed but not always with version 3.
more information....

Label en The Event label plugin creates objects containing 3 text blocks, each a particular layout in a frame (or not). You can choose if you want all the 3 texts blocks or not.
You can configure many details The idea is to configure one and make copies of it, making sure you have the same layout by all the labels (or select many and change some parameters).
I wrote this plugin for the calendar but it has many other applications as viewport labels, annotations, etc.... see below for more explanations

The label plug-in is a vectorscript PIO

how to...

How to use the Calendar
How to use the Event Label

Calendar pio:

Most of the parameters are hidden when they are not used. Days, weeks, months and years have all one parameter to set the visibility and two parameters to set the text size and row height in percent to the normally calculated dimensions.

Classes:
The calendar creates many classes (15) in order to set the colors, fills & line style to the different elements (even the fonts in VW 2015). It can take a long time to adjust them all so it's interesting to use template or a drawing already configured. Copying one calendar from another drawing will also import or actualize all the classes. The plugin will be sent with 2 templates.

  1. Dimensions: The width and height of the calendar! It's an object so it can be rotated.
  2. Date: Here you set the start date and the duration, the ending date will be calculated. changing the units will automatically change the duration to the new unit
  3. Vertical: If turn this on, the calendar will go from top to bottom. Weeks, months, years will be vertically oriented. Be aware of the adjust flipped text option (document preferences > display)

Stacks Image 1451

  1. Days parameters: The Sunday class option will draw a background with this one class behind each Sunday. With days names you get a shorted day name (3 letters) on the top the date. With name & date in 1 line the name and the day will be on one line (tue 25). When vertical mode and days names are set, it's always in one line.
  2. Weeks parameters: The ISO week numbers can be shown
  3. Months parameters: Number letter/month can be set in order to fit in small columns (the text always adapts itself to fit in the row but they will have different size as they don't have the same length). Month with year will put month and year in one line.
  4. Years parameters: Only text and row size...
  5. Other parameters: The text size will be set so that it fits to the column. In case of large columns the text size maximum parameter will prevent the use of text that is too large. Frame will give the whole calendar a border. This frame has its' own class. Each text block is framed by a rectangle and those rectangles have there own class (a class for days and days name, one for weeks and so on). The rounded corner option will create rounded corners on the blocks. The divide in rows option will divide the space under the text blocks in as many rows as set in number of rows. The width day field gives the width in current units of a day column (even when not visible).

Stacks Image 1456
Stacks Image 1454
Stacks Image 1446

Event Label pio:

Some parameters are hidden when they are not used.

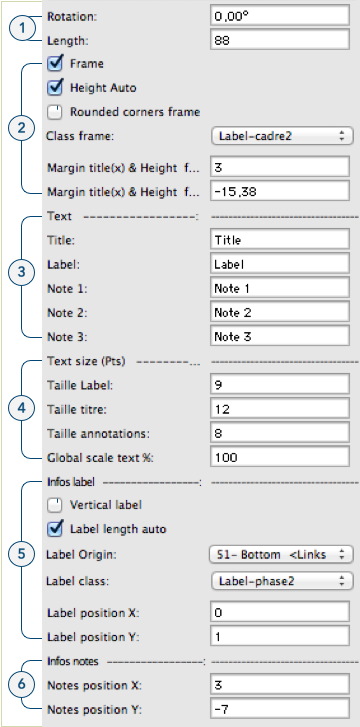
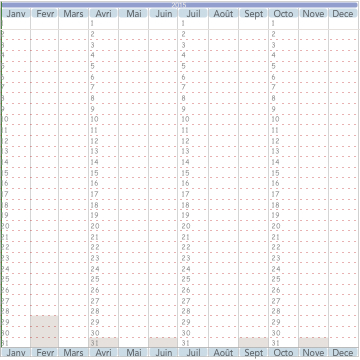
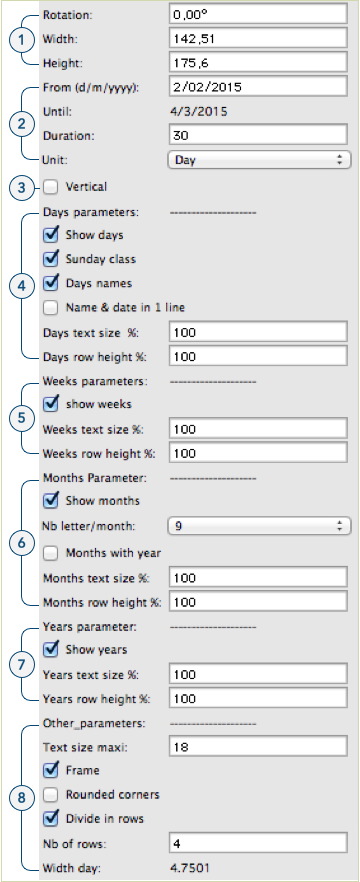
  1. Dimensions: The length will define the width of the label. This is the width of the frame if set, the end of the title & the notes that will wrap if longer. The rotation sets the orientation of the label
  2. Frame and margin: You can choice to have frame or not. Its' height can be automatically set so that the title and the notes fit into it. If you have a frame, it can have rounded corners and it have a class that you can define. The two fields under Class frame are control points that you can move manually or set by value. The first value (X coordinate) sets the margin of the title, the second (Y coordinate) sets the height of the label frame.

Stacks Image 1468

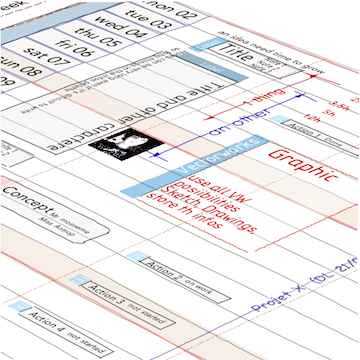
  1. Text: Here you set the title, label and the notes as text. The 3 note fields will be concatenated to one field. The resulting text will have maximum 255 characters so if the first have 255 character, the other will be omitted.
  2. Text size: You can set there the text size of each text block and a global scaling in percent that apply to all three texts.
  3. Infos label: Vertical label will set the orientation of the label text to 90° (you can rotate the whole label the the label text is horizontal and the other vertical). Label length auto will set the width of the label to the dimension of the frame, the height or the width depending on the orientation of the label. The label origin set the origin of the label text, vertically (bottom, center, top) and horizontally (left, center, right). At this origin you will find a control point that you can move to position the label or set by values in the coordinate fields (Label position). in Label class, you can choose a class for the label text
  4. Infos notes: The coordinate of the control point for the notes (the upper left corner) can be grabbed to position the notes or settings can be made using values. This is a good idea when you want to change a number of labels consistently at any one time.

Stacks Image 1474